Pistol Fundamentals
Pistol Fundamentals (Review)
The following information is meant as a review for students who have attended our pistol training, and covers a variety of the topics discussed.
Stance:
Stance is a luxury, when we can get it. One way of thinking about stance is just being as stable as possible in whatever position you’re in. Because your fight may not start as a gun fight, you should treat the pistol like ONE option, not THE option for defending yourself. A combative / fighting stance will provide you with stability, mobility, and balance. You should be able to move in any direction, absorb force from recoil or an aggressor physically pushing you, and be stable enough to keep the gun oriented at the target.
To start, put your feet together with toes pointing at the center of your target. From there, separate the feet to shoulder width, with your toes pointed at the shoulders of the target. Drop your dominant foot back (same side as your dominant hand). The center of the angle between your two feet should line up with the center of your intended target. You can check your natural point of aim by closing your eyes, extending your arms fully as if you were gripping the pistol, and verifying that your thumbs are in the center of the target. If not, adjust until your natural point of aim is in the center. When possible, always build your shooting platform from the toes to the fingertips.
Your weight should be over the balls of your feet. Bend your knees so that they are over your toes. Leaving your pelvis in place, lean forward at the waist so that your chest is over your knees. Check that you didn’t straighten up your legs as you leaned forward.
Your head should be straight up so that you can see what you’re shooting at. Don’t duck your head or roll up your shoulders.
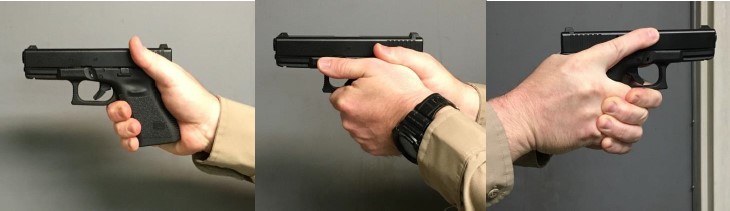
Grip:
When you grip the pistol, your Dominant hand should be as high on the pistol as possible to reduce motion under recoil. Close any gaps between the web of your hand and the top of the grip, while ensuring that the slide will not cut your hand as it moves.
The sight line from front sight to rear sight should then continue through the web of your hand and then the scaphoid at the base of the wrist. This will naturally align the firearm with your forearm and allow you to shoot without a formal sight picture when "point shooting" is necessary due to proximity to the target.
Your trigger finger should be in the “Home” or “Register” position whenever you have not consciously decided to shoot. Your thumb should be relaxed and neutral in an upward slant. DO NOT make a fist around the gun. You will place your support hand in the void space created by your dominant hand.
Your support hand will rotate so that your thumb is pointed directly at the target. The fingers of your support hand should be at an approximate 45* angle towards the ground, so that you can slide them around the grip of the gun when you establish a two-hand grip. Use the idea of the shadow-puppet giraffe / rhino if that is helpful.
The complete grip should have your support hand thumb pointing at the target, resting just below the slide. Your dominant thumb may rest gently on top of it, but DOES NOT apply pressure. If you put pressure on your dominant thumb, you will push your support hand off the gun and open your grip.
You may lock your arms or leave them bent. That decision should be based on your environment. How much room do you have to work the gun? Are you moving or shooting from a stable stance? How many targets are you engaging?
• Arms locked results in better recoil control. With the thumbs forward grip and locked arms, you can shoot at a single target rapidly. The recoil of the gun must push the combined weight of both arms, resulting in less movement to the muzzle. Further, the muzzle should track up and down, not at angles.
• Arms bent allows you to move through a structure or transition between targets easier. You can swing the gun between two points much faster. The drawback is that you will control the muzzle less, and the recoil can move the gun at angles because your arms are not locked out. Movement will occur at the wrists and elbows.
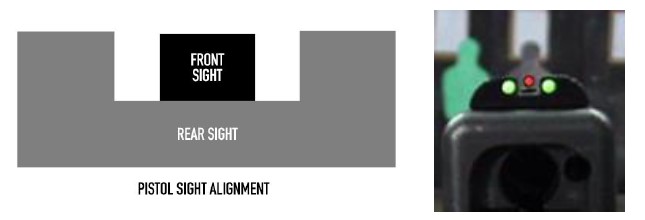
Sight Alignment:
Make an “E” lying 90* to the left. The top of the sights should be flat across the top and with equal space in between each leg. Look at the 90* angles on each of the four corners. The iron sights should be et up that the bullet will strike at the point the front sight is cutting in half.
The dots on the sight are not as precise as making an "E" with the sights. However, in close combat or when within 7-10 yards from your target (based on your specific sights), lining up the dots should allow you to shoot into the center mass of a humanoid target. This is a technique that can be used for combat shooting, and is dependent on your particular sights and equipment. You should verify how far away you can "get away" with using the dots instead of the 4 corners of the sights and understand when each is appropriate.
For Miniaturized Red Dot Sights / Pistol Optics, the reticle should cover the intended point of impact. However, it is important to remember the minimal difference in line of sight vs. line of bore and to understand your external ballistics as discussed in the course. Know your zero point (we recommend 25 yards for a pistol) and understand where your round will hit based on that zero.
Sight Picture:
The Sights will rest in the center of the target. Pick a specific point on your target about the size of a button, or no larger than 1”. On a human adversary, this point should be a reference point to guide the round to the upper part of the thoracic cavity. You’re trying to impact the Central Nervous System, Circulatory System, or Respiratory System. If there’s no specific logo or point you can identify, put the sights in the center of what you’re trying to hit.
Move the sights in front of your dominant eye and transition your focus to the front sight. Look at the very top of the front sight. The rear sight will be blurry. The target will be blurry. The front sight will be in focus.
If you can see all of what you’re shooting, you have probably moved the gun so that you can look at it. The front sight is the last reference point you have for where the gun is pointed, so keep looking at that.
When shooting for defense, we will shoot until the bad guy changes the behavior that caused us to shoot. That can be dropping the weapon, fleeing from the combat, falling to the ground and stopping the aggression, putting his hands up in surrender, or any of the things discussed. If the target is still a threat, it needs to be shot more. Once their aggressive action stops, you can evaluate the situation and determine if more force is needed.
Trigger Control:
“PRESS” the trigger slowly to the rear using the second knuckle on your trigger finger to avoid sympathetic grip or rolling your hand into a fist and causing low / interior shooting.
***NOTE*** Manually holding the sear to the rear is NOT how you should train to shoot. While we sometimes cover this exercise in class to help a student understand the parts and movement of the trigger, you should practice pressing the trigger smoothly to the rear through BOTH STAGES of the trigger movement. Do not pin the trigger and move forward only to sear reset, as this will cause performance issues later on under stress. As you get more proficient, the trigger reset should occur as the gun is cycling and moving under recoil.
Follow-Through:
For ONE shot, you should see your sights TWO times. As soon as you break a shot, your priority should be to find the sights on the target again.
If the target needs to be shot again, shoot. If the target has changed, you may evaluate. Your focus should remain on the front sight, as discussed during Sight Picture.
Looking at your target will cause you to waste time and also results in shooting low.
Breathing:
You don't have time to do a fancy breathing exercise right now. You should be moving, communicating, and probably shooting. Yelling "Get back!" or giving other verbal commands accomplishes a variety of things. It creates witnesses who heard you trying to get the aggressor to leave you alone. It tells the other party what you want him / her to do to avoid violence. It helps get your breathing started and breaks you out of the mental freeze that may have gripped you.
Instead of focusing on shooting at a natural respiratory pause or holding your breath, just breathe normally and focus on sights and trigger. Any time you halt, slow, or otherwise interrupt your body's natural rhythm you're going to be putting yourself under additional stress.